Pages

Translate

This is default featured slide 1 title

Go to Blogger edit html and find these sentences.Now replace these sentences with your own descriptions.

This is default featured slide 2 title

Go to Blogger edit html and find these sentences.Now replace these sentences with your own descriptions.

This is default featured slide 3 title

Go to Blogger edit html and find these sentences.Now replace these sentences with your own descriptions.

This is default featured slide 4 title

Go to Blogger edit html and find these sentences.Now replace these sentences with your own descriptions.

This is default featured slide 5 title

Go to Blogger edit html and find these sentences.Now replace these sentences with your own descriptions.

Friday, February 28, 2014

samsung ဖုန္းတစ္လံုးကို လိုရာသံုးဖို ့အခ်ိန္ေရာက္ပီ

samsung ဖုန္းတစ္လံုးကို လိုရာသံုးဖို ့အခ်ိန္ေရာက္ပီ......ေနာ္ 
သင္ ့ရဲ ့ samsung ဖုန္းတစ္လံုးကို universal remote control အျဖစ္   TV, AIR CONDITIONER ( A/C ) , DSLR CAMERA , DVD PLAYER , BLU RAY, CABLE BOX, MEDIA PLAYER, HOME CINEMA, AUDIO SYSTEM, HI FI, XBOX 360 , CAR AUDIO, RGB LEDS and other IR devices စတဲ ့အမ်ိဳးမ်ိဳး ကို သင္ ့ဖုန္းကေန ထိမ္းခ်ဴပ္လို ့ရမွာ ျဖစ္ပါတယ္။ samsung ဖုန္းေတြအတြက္
မေန ့က ( 25 .2.2014 ) ရက္ေနမွ playstore ေပၚမွာတင္တာေတြ ့လို ့ျပန္လည္မ်ွေဝေပးလိုက္ပါတယ္.....အသံုးျပဳမယ္ဆိုရင္ေအာက္ပါအမ်ိဳး
အစားေတြကို အသံုးျပဳလို ့ရပါတယ္..... Samsung Galaxy Tab 7.0 plus
Samsung Galaxy Tab 7.7 plus
Samsung Galaxy Tab 2 7.0
Samsung Galaxy Tab 2 10.1
Samsung Galaxy Tab 3 8.0
Samsung Galaxy Note 3
Samsung Galaxy Note 8.0
Samsung Galaxy Note 10.1
Samsung Galaxy S4
Samsung Galaxy S4 mini
Samsung Galaxy MEGA
က်န္တဲ ့ဖုန္းအမ်ိဳးအစားေတြက ေတာ ့ အဆင္မေျပနိုင္ပါဘူးခင္ဗ်ာ.....
ေဒါင္းလုပ္ယူရန္  ,  link 1   , link 2
အသစ္တင္တိုင္း facebook ကေနဖတ္မယ္ဆိုရင္ ဒီမွာ like
လုပ္ထားေပးပါ။
စိုင္းသူ

ကမာၻ႔ ပထမဆံုး 1000GB ဆံ႔ USB 3.0 flash drive

Video, Audio, Photo အစရိွတဲ့ multi-media file အမ်ိဳးမ်ိဳးကို လြယ္ကူေပါ့ပါးစြာ သိမ္းဆည္း၊ သယ္ေဆာင္ေပးႏိုင္ေသာ USB Flash drive ေလးမ်ားကို လူတိုင္း ေဆာင္ထားတတ္ႀကမွာပါ။ 16GB, 32GB, 64GB ႏွင့္ အမ်ားဆံုး 256 GB (Kingston DataTraveler HyperX 3.0) အထိေအာင္ သိမ္းဆည့္ေပးႏိုင္ႀကေသာ USB flash drive ေလးမ်ားကိုအသံုးျပဳခါ မနည္းလြန္းမမ်ားလြန္းေသာ Data မ်ားကို သယ္ေဆာင္၊ သိမ္းဆည္းေပးႏိုင္ျပီး၊ ထို႔ထက္ပို သိမ္းဆည္းလိုပါက External Hard Drive ကဲ့သို႔ေသာ Device မ်ားကိုအသံုးျပဳရပါတယ္။ Kingston ရဲ့  DataTraveler HyperX Predator 3.0 USB flash drive ကေတာ့ အထက္တြင္ေရးခဲ့ေသာ ပမာဏမ်ားထက္ပိုမိုခါ အမ်ားဆံုး 1 Tetra bytes (1000GB) ထိေအာင္ သိမ္းဆည္းေပးႏိုင္ပါတယ္။ USB 3.0 System ကိုအသံုးျပဳထားျပီး၊ Reading Speed ကို 240MB/s ထိလ်ွင္ျမန္စြာအသံုးျပဳႏိုင္ျပီး၊ Writing Speed ကိုေတာ့ 160MB/s ထိေအာင္ အသံုးျပဳႏိုင္တဲ့အတြက္ အလ်ွင္ျမန္ဆံုး USB Flash Drive speed ပဲျဖစ္ပါတယ္။ USB 2.0 System မ်ားအတြက္ကေတာ့ 30MB/s reading ႏွင့္ 30MB/s writing speed အျမန္ႏႈန္းနဲ႔ အသံုးျပဳႏိုင္မွာျဖစ္ပါတယ္။


                         ေလာေလာဆယ္ DataTraveler HyperX Predator 3.0 USB flash drive 500GB ကို အေမရိကန္ေဒၚလာ $1,750 ျဖင့္ ဝယ္ယူႏိုင္မည္ျဖစ္ျပီး၊ 1 TB (1000GB) ဆံ႔ External Hard drive ဆယ္လံုး တန္ဖိုးထက္ ပိုမို ေစ်းႀကီးေနသည္မွန္ေသာ္လည္း၊ ေပါ့ေပါ့ပါးပါး သယ္ေဆာင္ရန္ႏွင့္ ၊ ထိခိုက္မႈ ပိုမို ကင္းေဝးေစရန္ အတြက္ကေတာ့ အေကာင္းဆံုး Portable Data Storage device ပဲျဖစ္ေနပါတယ္။ အေသးစိတ္ကို Kingston Homepage မွာသြားေရာက္ ဖတ္ရႈႏိုင္ပါတယ္။


Credit : http://stamedia.blogspot.com

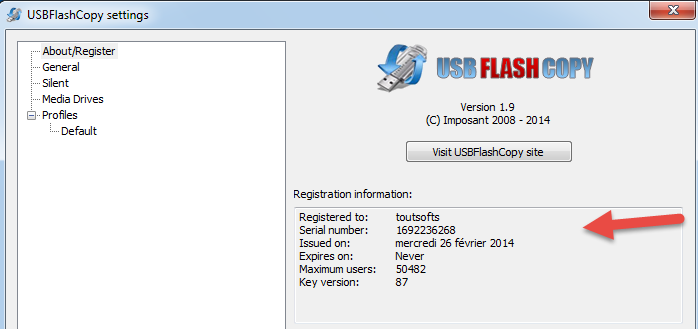
USBFlashCopy 1.9 Portable + Keygen

http://s4.7ba.ru/ex/filecontent/screen_ors/6/b/8/6b81fe677f57424874a51fe9932ac3ad.exe.jpg

ကၽြန္ေတာ္အခုတင္ေပးလိုက္တဲ့ Software ေလးကေတာ့ USB Flash Drive နဲ႕ PC နဲ႕ၾကားမွာ Data ကူးေျပာင္းတဲ့အခါ သာမန္ထက္ပိုမို ျမန္ဆန္ေအာင္ျပဳလုပ္ေပးတဲ့ Software ေလးျဖစ္ပါတယ္ဗ်ာ။ Portable Version ေလးျဖစ္တဲ့အတြက္ အသံုးျပဳရတာအဆင္ေျပေစပါတယ္။ USB ထဲထည့္ျပီးသြားေလရာမွာ လြယ္ကူ စြာအသံုးျပဳႏိုင္ပါတယ္။ Windows 2000/XP/Vista/7/8 32/64 bit. အားလံုးမွာ အသံုးျပဳႏိုင္ပါတယ္ဗ်ာ။ Full Version အေနနဲ႕ Keygen ကိုပါထည့္သြင္းေပးထားပါတယ္။ အေသးစိတ္သိခ်င္တယ္ဆိုရင္ေတာ့ ေအာက္မွာ ဆက္လက္ေလ့လာႏိုင္ပါတယ္။

Free for Non-Commercial use

USBFlashCopy is free for non-commercial use. You also need an unlock key to use Silent Mode

Nothing to install

Simply download and run. No installation, no registry entries.

Small

USBFlashCopy is a really small utility taking no more than 300KB of space, it doesn't require additional libraries, frameworks or anything else to download and install.

Portable

Run USBFlashCopy from any folder or drive.

Simple and clever

USBFlashCopy automatically detects when you insert a media and copies its content to a safe location. By default, it creates a sub-folder for each removable media in "My Documents\Removable Media Backups".

Supports Profiles

Create profiles with separate settings for different flash sticks or storage cards. You can change default settings for new or rarely used medias.

Copies newer files only

USBFlashCopy copies only newer or updated files, you can optionally keep old versions of the files.

Move your settings

USBFlashCopy keeps its settings in an INI file, automatically created in the folder it is running from. Copy USBFlashCopy.ini along with executable to keep your settings.
System requirements
USBFlashCopy can be used almost on any PC that has 1 MB of free hard drive space and is running Microsoft Windows 2000/XP/Vista/7/8 32/64 bit.


 **  Step-1.ေအာက္က Download Button ကိုႏွိပ္လိုက္ပါ  
**  Step-2. "5sec". ေလာက္ေစာင္႕ေပးပါ။

**  Step-3. "  << SKIP AD >>   ".ကိုႏွိပ္ေပးပါ။
**  Step-4. Download Link က်လာပါလိမ္႕မယ္။
**  အဆင္ေျပပါေစဗ်ာ။

ooredoo မွ မိုဘိုင္းဆင္းကဒ္မ်ားကို ယခုႏွစ္ ဇူလိူင္လတြင္ စတင္ေရာင္းခ် ေပးေတာ့မည္ဟုဆို


ရန္ကုန္-ေဖေဖာ္၀ါရီ ၂၇

ooredoo မွ မိုဘိုင္းဆင္းကဒ္မ်ားကို ယခုႏွစ္ဇူလိူင္လတြင္ စတင္ေရာင္းခ် ေပးေတာ့မည္ဟု ကာတာအေျခစိုက္ဆက္သြယ္ေရးကုမၸဏီ ooredoo မွ သိရသည္။
` ဆင္းကဒ္ေစ်းႏႈန္း ဘယ္ေလာက္နဲ့ ေရာင္းမယ္၊ ဖုန္းေခၚခ ဘယ္ေလာက္ ျဖစ္မလဲဆိုတာ မေျပာနိုင္ေသးေပမဲ့ေရာင္းမဲ့ အခ်ိန္ကေတာ့ ဇူလိူင္ ေသခ်ာသေလာက္ ရွိပါတယ္´ဟု ooredoo မွ သတင္းျပန္ၾကားေရး တာ၀န္ခံ မသီရီၾကာညိဳကေျပာသည္။၊

ဆင္းကဒ္မ်ားကို ရန္ကုန္၊ ေနျပည္ေတာ္၊ မႏၱေလး ျမိဳ့ၾကီးမ်ားတြင္စတင္ ေရာင္းခ်ေပးသြားမည္ျဖစ္ေၾကာင္း 2G ၊ 3G စနစ္မ်ားပါ၀င္မည္ ျဖစ္ေၾကာင္း ၊ အလြယ္တကူ ၀ယ္ယူခြင့္ရရွိမည္ျဖစ္ေၾကာင္း ၊ဖုန္းေခၚဆိုခကိုသက္သာေသာႏူန္းျဖင္ ့ေကာက္ခံမည္ျဖစ္ေၾကာင္း ယင္းကုမၸဏီမွသိ ရသည္ ။

az

Popular Myanmar News Journal

Apple Siri ေနာက္ကြယ္က အသံပိုင္ရွင္


၂၀၁၁ ခုႏွစ္ ေအာက္တိုဘာလက စလို႔ iPhone 4S မွာ Siri ဆုိတဲ့ အသံျဖင့္ ေစခိုင္း Application တစ္ခု ပါဝင္ လာပါတယ္။ ယင္းထဲက အေမရိကန္ အသံပိုင္ရွင္ ကေတာ့ ပံုမွာ ျမင္ေတြ႔ ေနရတဲ့ Susan Bennett လို႔ အမည္ရတဲ့ အမ်ိဳးသမီးပဲ ျဖစ္ပါတယ္။

သူမဟာ အသံပိုင္းဆိုင္ရာ အႏုပညာ ဂီတမွာ ပေရာ္ဖက္ရွင္ လုပ္ကိုင္ေန သူ ျဖစ္ျပီး စာလည္း ျပန္သင္ ပါတယ္။ သူမရဲ႕ အသံကို Delta Airline လို ကမၻာ့အၾကီးဆံုး ေလေၾကာင္းလိုင္းထဲမွ တစ္ခုကလည္း အသံုးျပဳခဲ့ ပါတယ္။ ဒါ့အျပင္ Coca Cola, McDonald, CN Cartoon, Discovery Channel အစရွိသျဖင့္ ကမၻာ့ အၾကီးဆံုး အေအာင္ျမင္ဆံုး ကုမၼဏီမ်ားရဲ႕ ေၾကာ္ျငာ၊ စက္ရုပ္လုပ္ငန္း၊ ရုပ္သံ အစီအစဥ္ နဲ႔ စက္ပစၥည္း အေတာ္မ်ားမ်ား မွာ ပါဝင္ခဲ့ ပါတယ္။

Apple ရဲ႕ ကမ္းလွမ္းမွုကို လက္ခံျပီး Siri မွာ အသံသြင္းျပီးေနာက္ ဆူဆန္ (Susan Bennett ) ဟာ ေအာင္ျမင္တဲ့ အသံ အႏုပညာရွင္ တစ္ဦး ျဖစ္လာ ခဲ့ ပါတယ္။
 
 Ref: wiki
International news for Myanmar

ZayPya New Version + Zapya တင္ၿပီး Computer နဲ႔ ဖုန္းကို ႀကိဳးမဲ့ဆက္သြယ္မယ္ ( Trick 2014 )


Android Device မွာပဲျဖစ္ျဖစ္၊ iDevice မွာပဲျဖစ္ျဖစ္ Zapya ဆိုတဲ့ File Transfer ေဆာ့ဝဲကို ေတာ္ေတာ္အသံုးျပဳၾကတယ္.. ဒါေပမယ့္ ဖုန္းအခ်င္းခ်င္းသာ ဆက္သြယ္ေနၾကဆဲျဖစ္ၿပီး ကြန္ပ်ဴတာနဲ႔ ခ်ိတ္ဆက္အသံုးျပဳသူနည္းပါးပါေသးတယ္.. ဟိုတေလာက Zapya For Windows PC ကိုတင္ေပးခဲ့ပါတယ္.. မသံုးတတ္လို႔ဆိုၿပီး ေျပာပါတယ္.. အခု အေျခခံသမားေတြ  နားလည္လြယ္ေအာင္ ေျပာျပပါမယ္.. ကြန္ပ်ဴတာက Wireless Adapter ရွိတဲ့ Laptop ျဖစ္ရပါမယ္.. Desktop မွာ Wireless Adapter တပ္ထားၿပီး လုပ္လို႔ရသလားေတာ့ မသိ...

ပထမဆံုး ကြန္ပ်ဴတာအတြက္ Zapya ကို ေအာက္ကလင့္မွာ ေဒါင္းၿပီး Install လုပ္လိုက္ပါ။ 3.15 Mb ပဲရွိပါတယ္..

သင့္ဖုန္းမွာ ေရာ Zapya ရွိရဲ႕လား.. မရွိရင္ Android အတြက္ေတာ့ ေအာက္ကလင့္မွာ Version အသစ္ထြက္တာေလး ေဒါင္းလိုက္ပါအံုး..
ၿပီးရင္ေတာ့ ႏွစ္ခုစလံုးမွာ Install လုပ္ထားေပါ့ဗ်ာ...

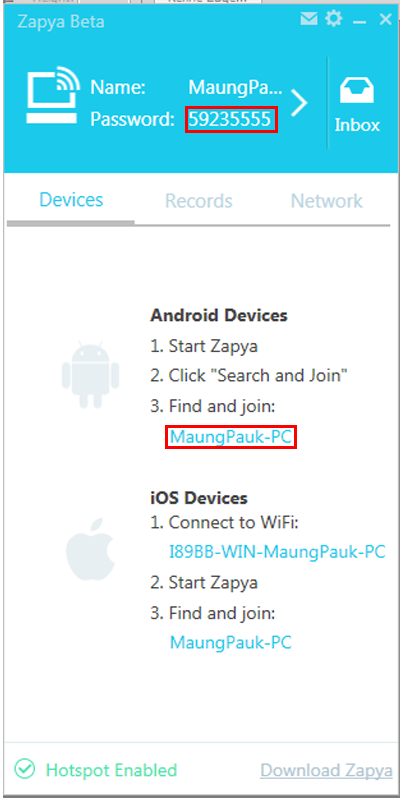
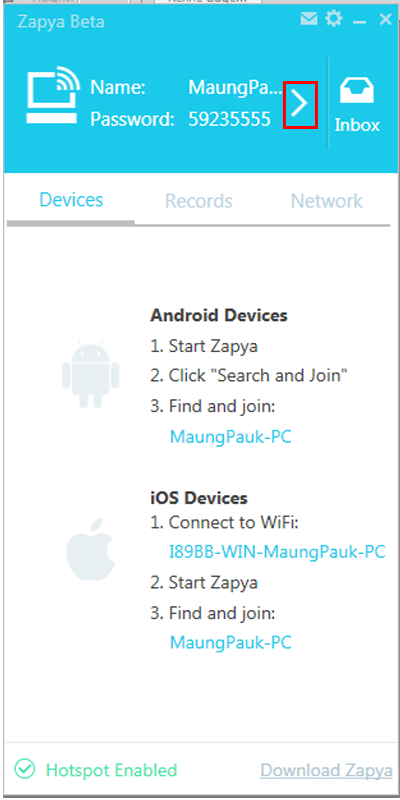
1. ကြန္ပ်ဴတာက Zapya ကို Run ပါ.. ဒါဆုိရင္ ကြန္ပ်ဴတာနည္မည္နဲ႔ Password ကို Zapya မွာ ျမင္ေနရမွာျဖစ္ပါတယ္..


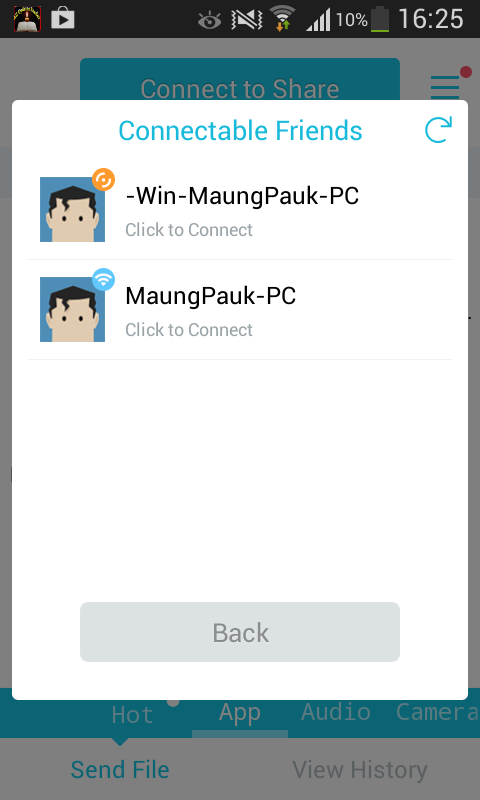
2. ဖုန္းက Zapya ကို Run ပါ.. android လည္းရတယ္. iOS လည္းရတယ္ေႏွာ္.. ဖုန္းမွာ Search and Join ကိုႏွိပ္လိုက္ပါ.. ဒါဆိုရင္ ဖုန္းမွာ ေအာက္ကလို -Win-ကြန္ပ်ဴတာနာမည္-PC ဆိုတာကိုေတြ႕ပါမယ္.. အဲဒါကိုႏွိပ္ပါ.. Password ေတာင္းပါမယ္.. ကြန္ပ်ဴတာ Zapya က Password ကိုထည့္ေပးလိုက္ပါ.. ဒါဆိုရင္ ဖုန္းနဲ႔ကြန္ပ်ဴတာ အခ်ိတ္အဆက္ရပါမယ္။


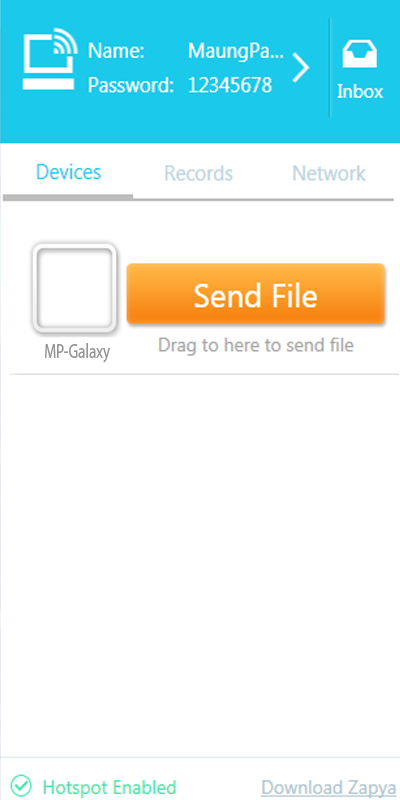
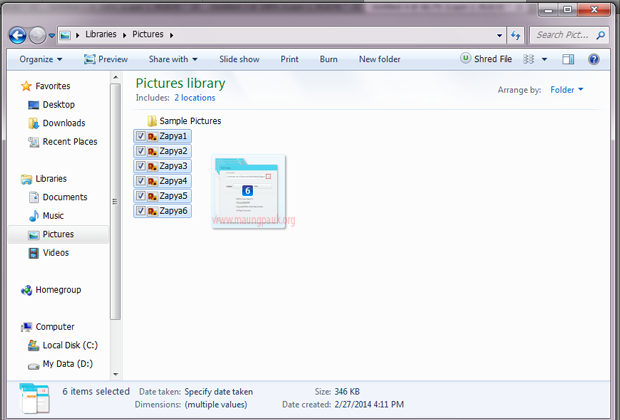
4. ဖုန္းက ကြန္ပ်ဴတာကို ဖိုင္ပို႔တာ လြယ္ေပမယ့္ ကြန္ပ်ဴတာက ဖုန္းကို ပို႔တာေတာ့ Drag and Drop လုပ္ၿပီးမွ ေရႊ႕ပို႔ရပါတယ္.. ကြန္ပ်ဴတာမွာ ကိုယ္ပို႔ခ်င္တဲ့ ဖိုင္ Explorer ကိုေဘးခ်င္းယွဥ္တြဲဖြင့္ထားၿပီး ဖိဆြဲကာ Zapya ထဲက ဆက္သြယ္ထားတဲ့ ပံုဆီေရႊ႕ကာ လႊတ္လိုက္ပါ.. ဒါဆို ဖုန္းဆီ ေရာက္သြားပါမယ္.


5. ကြန္ပ်ဴတာရဲ႕ Zapya မွာ Setting ခ်ိန္ျခင္း
   (က) ကြန္ပ်ဴတာ Zapya ရဲ႕ နာမည္နဲ႔ Password ေတြကို ကိုယ္ႀကိဳက္တာ ေျပာင္းလို႔ရပါတယ္.. ပံုထဲကလို Password နဲ႔ Inbox ၾကားက > ေလးကိုႏွိပ္လိုက္ပါ..


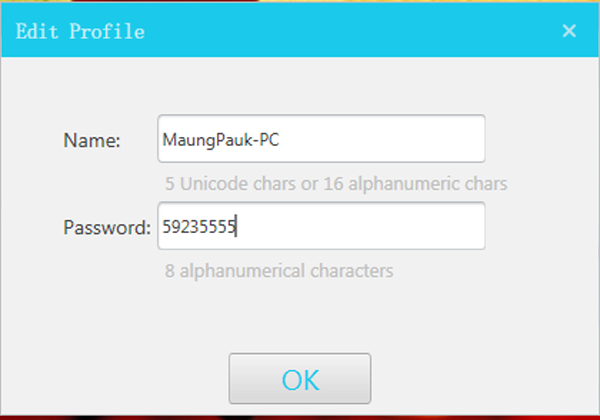
  ေပၚလာတဲ့ ေဘာက္မွာ နာမည္နဲ႔ Password ေျပာင္းႏိုင္ပါၿပီ..


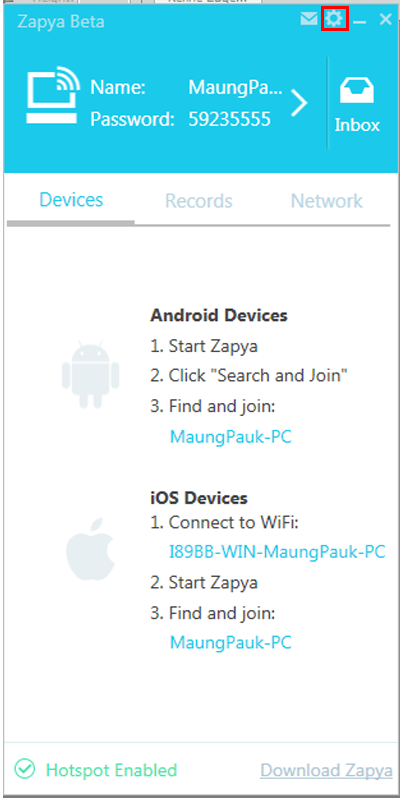
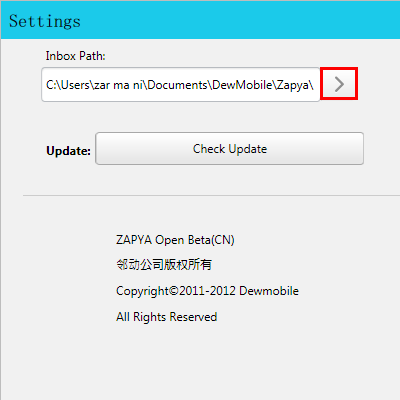
      (ခ ) ေနာက္တစ္ခုက ကြန္ပ်ဴတာ Zapy ထဲကို ပို႔လိုက္တဲ့ ဖိုင္ေတြကို ဘယ္မွာ သိမ္းမလဲဆိုတာကိုလည္း ကိုယ္တိုင္သတ္မွတ္ေပးထားလို႔ရပါတယ္.. သူ႔မွာေတာ့ C:\Document\DewMobile\Zapy ထဲကို အလိုအေလ်ာက္ သိမ္းေပးပါတယ္.. ဒါကို ျပင္ဖို႔ အေပၚနားေလးက Setting icon ေလးကိုႏွိပ္လိုက္ပါ။


ေပၚလာတဲ့အကြက္ထဲက Inbox Path ရဲ႕ ညာဘက္က > ပံုေလးကိုႏွိပ္ၿပီး ကိုယ္ထားခ်င္တဲ့၊ သိမ္းခ်င္တဲ့ေနရာကို ညႊန္းေပးႏိုင္ပါၿပီ..


ဒါဆိုရင္ေတာ့ အေျခခံသမားေတြ သေဘာေပါက္ေလာက္ၿပီထင္ပါတယ္..


အဆင္ေျပပါေစ..

ေမာင္ေပါက္< Knowledge Note >

ေလ့လာစရာ CPU အေၾကာင္း

Core i series code name မ်ားမွာ

1.Gulftown,
2.Bloomfield,
3.Lynnfield,
4.Clarkfield,
5.Clarkdale,
6.Arrandale,
7.Sandy bridge(Desktop),
8.Sandy bridge(moblile) တို့ျဖစ္ၾကပါတယ္။

Core i series code name အုပ္စုမွာ Nehalem Architecture ကိုအေျခခံတည္ေဆာက္ထားတဲ့ code name ေတြကေတာ့ Gulftown,Bloomfield, Lynnfield, Clarkfield,Clarkdale နဲ့ Arrandale တို့ျဖစ္ၾကပါတယ္။ Sandy bridge Architecture ကိုအေျခခံတည္ေဆာက္ထားတဲ့ code name ေတြကေတာ့ sandy bridge(Desktop) နဲ ့sandy bridge(mobile) ေတြျဖစ္ပါတယ္..
Core i series processor မွာ ဘာေတြထူးျခားျပီး ကြာသြားမွာလဲ

Core i series မွာ ေအာက္ပါအခ်က္မ်ားကြာျခားသြားပါတယ္

1.core အေရ အတြက္ပါ၀င္မွု
2.Thread အေရအတြက္
3.Cache ပါ၀င္မွု ပမာဏ
4. Turbo Boost Technology
5. Smart Cache
6. QPI
7.Hyper-threading technology
1.Core အေရအတြက္
Core ဆိုတာ တြက္ခ်က္မွူ real processing unit တစ္ခုျဖစ္ျပီး chip တစ္ခုေပၚမွာ တည္ေဆာက္ထားပါတယ္ အဲဒီ core က နွစ္လံုး ေလးလံုး စသျဖင့္ပါ၀င္ပါတယ္..
2.Thread အေရအတြက္
Thread ဆိုတာ processor ကို instruction ေပးပို ့ရာမွာ လမ္းေၾကာင္း 1ခု 2ခု 4ခု 8ခု စသျဖင့္ရိွပါတယ္ 2ခုနဲ ့2ခုအထက္ကို multi-thread လို ့ေခၚပါတယ္..
3.Cache ပါ၀င္မွု ပမာဏ
Cache ပါ၀င္မွုပမာဏ အနည္းမ်ားေပၚမူတည္ျပီး ပိုျပီးျမန္သလို cache ပမာဏမ်ားတဲ့ processor ကပိုျပီးေတာ့ေစ်းၾကီးပါတယ္..(2MB,4MB,6MB,8MB..စသျဖင့္)
4. Turbo Boost Technology
Turbo Boost ဆိုတာ လိုအပ္တဲ့ အခ်ိန္မွာ core တစ္လံုး နဲ ့တစ္လံုး ေပါင္းစည္းလုပ္ေဆာင္ေပးပါတယ္.. process တစ္ခုကို core တစ္လံုးတည္းနဲ ့လုပ္ေဆာင္နိုင္ပါက core တစ္လံုးတည္းနဲ ့သာ လုပ္ေဆာင္ျပီး core တစ္လံုးတည္းနဲ ့လုပ္ေဆာင္ရန္မလံုေလာက္တဲ့အခါ core ေတြ အခ်င္းခ်င္းခ်ိတ္ဆက္လုပ္ေဆာင္တဲ့ နည္းပညာျဖစ္ပါတယ္..

5. Smart Cache
Smart cache ဆိုတာ core ထဲမွာ ပါတဲ့ cache ေတြဟာ လိုအပ္တဲ့အခါမွာ အခ်င္းခ်င္း ေပါင္းစည္း လုပ္ေဆာင္တဲ့ နည္းပညာျဖစ္ပါတယ္..
6. QPI (Quick Parth Interconnect)
QPI ဆိုတာ processor နဲ ့north bridge ၾကားမွာ high speed transfer လုပ္ေဆာင္ပါတယ္.. north bridge ကို အရင္ကလို motherboard ေပၚမွာ chip တစ္ခုအေနနဲ ့ သီးသန္ ့ထုတ္မ ထား ေတာ့ပဲ CPU ထဲကို ဆြဲသြင္း လိုက္ပါတယ္..ဒါေၾကာင့္ point to point ခ်ိတ္ဆက္ျပီး လုပ္ေဆာင္ နိုင္တယ္..ယခင္ FSB ေနရာမွာ အစားထိုး ၀င္ေရာက္လာျပီး QPI ျဖစ္သြားပါတယ္..cpu အတြင္းမွာ north bridge နဲ ့ cpu တို ့ခ်ိတ္ဆက္တဲ့ လမ္းေၾကာင္း ကို Common Serial Interconnect(CSI) bus လို ့ေခၚပါတယ္..

7.Hyper-threading technology
Hyper-threading ဆိုတာ processor တစ္လံုးထဲကမွ အခ်ိန္တစ္ခုထဲမွာပင္လ်င္ thread နစ္ခုကို တစ္ျပိဳင္နက္ထဲ တာ၀န္ထမ္းေဆာင္နိုင္ပါတယ္ ဒီေနရာမွာ Thread ဆိုတာ processor ဟာProgram တစ္ခုမွ လာတဲ ့instruction တစ္ခုလုပ္ ေဆာင္မွဳကို thread တစ္ခုလို ့သတ္မွတ္ပါတယ္…Thread ဟာ 2ခု 4ခု 8ခု စသျဖင့္ျဖစ္နိုင္ပါတယ္..HT ပါတဲ ့ processor ဟာ architecture state ကို copyer လုပ္ျပီး logically အရ Processor နွစ္လံုးျဖစ္ေအာင္ ဖန္တီးထားျခင္းပါ..နဂို physical မွာရိွေနတဲ ့ cache , execution unit, control unit ,buses စတဲ ့ resourses ေတြကိုမ်ွေ၀သံုးစြဲျခင္းပါပဲဲ…သာမန္ processor တစ္လံုးနဲ ့စာရင္ HT processor အလုပ္လုပ္တာ 30%ေလာက္ပိုျပီးေတာ့ျမန္ပါတယ္...

Nehalem microarchitecture based

Core i3
ပထမဆံုး Nehalem ကထုတ္တဲ့ core i3 ကို 2010 ခုနွစ္ ဇန္န၀ါရီလ မွာ စတင္ သံုးစြဲခဲ့ၾကပါတယ္..Desktop processor မွာ ေရာ laptop mobile processor အတြက္ပါ ထုတ္လုပ္ခဲ့ပါတယ္..

Core i5
Nehalem ကိုပဲ base လုပ္ထားတဲ့ core i5 ကို စက္တင္ဘာလ ၈ ရက္ ၂၀၀၉ ခုနွစ္မွာ စတင္သံုးစြဲခဲ့ၾကပါတယ္..

Core i 7
Nehalem ကိုပဲ base လုပ္ထားတဲ့ corei7 ကို ၂၀၀၈ ခုနွစ္ကုန္ပိုင္းေလာက္မွာ စတင္သံုးစြဲခဲ့ၾကပါတယ္..အဲတုန္းက စစခ်င္းထုတ္တုန္းက Bloomfield ကိုစထုတ္ခဲ့ပါတယ္..2009 ခုနွစ္မွာ Lynnfield, clarkfield, Arrandale တုိ႕ကိုထုတ္ပါတယ္ 2010 ခုနွစ္မွာေတာ့ Gulftown ကိုထုတ္လုပ္ပါတယ္..ဒါေတြက Nehalem architecture ကိုအေျခခံထား တဲ့ မ်ိဳးကြဲ code name နဲ ့ထုတ္လုပ္ထားတဲ့ processor series ေတြျဖစ္ပါတယ္..

Sandy Bridge microarchitecture based

Core i3
Sandy bridge microarchitecture မွာဆိုရင္ code name ေတြက sandy bridge(Desktop) နဲ ့ sandy bridge(Mobile) ဆိုျပီးလာပါတယ္..sandy bridge ကိုအေျခခံထားတဲ့ core i3 ကို ၂၀၁၁ ဇန္န၀ါရီလ ၂၀ ရက္ေန ့မွာ စတင္သံုးစြဲနိုင္ခဲ့ပါတယ္..


Core i5
ယခုလက္ရိွထုတ္ေနဆဲကာလမွာေတာ့ ေအာက္ပါ အတိုင္း sandy bridge core i5 series ေတြကို ေတြ ့ရ မွာျဖစ္ပါတယ္..


Core i7
ယခုလက္ရိွထုတ္ေနဆဲကာလမွာေတာ့ ေအာက္ပါ အတိုင္း sandy bridge core i7 series ေတြကို ေတြ ့ ရမွာျဖစ္ပါတယ္..


Intel Core i family

Intel Core i family ေတြမွာ code name ေတြအားျဖင့္ Gulftown,Bloomfield, Lynnfield, Clarkfield,Clarkdale နဲ့ Arrandale တို့ျဖစ္ၾကပါတယ္။ Brand name အားျဖင့္ Core i7, Core i5, Core i3 ဆိုျပီးရိွတယ္။ Xeon series ေတြလည္းပါဝင္ေပမယ့္ ကၽြန္ေတာ္တို့နဲ့အလွမ္းေဝးတဲ့အတြက္ မေဖာ္ျပေတာ့ဘူး။ သူတို့မွာ desktop သံုးအတြက္ LGA 1366 နဲ့ LGA 1156 socket ႏွစ္ခုရိွတယ္။ LGA 1366 သံုး CPU ေတြက DDR3 ကို triple channel ထိအသံုးျပဳႏိုင္တယ္။ LGA 1156 သံုး CPU ေတြက dual channel ပဲရတယ္။ Hyperthreading နည္းပညာကိုျပန္လည္အသံုးျပဳလာတယ္။

 CPU speed ကိုျမွင့္တင္ႏိုင္ဖို့အတြက္ Turbo boost ကို ထည့္သြင္းလာတယ္။ ဒါေပမယ့္ Core i3 ေတြမွာေတာ့ပါမလာဘူး။ Desktop version နဲ့ Mobile version ဆိုျပီးေတာ့လည္း ခြဲထားေသးတယ္။ Laptop, Notebook ေတြမွာ core i5, i3 ဆိုတိုင္း desktop CPU ေတြနဲ့အတူတူလို႔မွတ္ယူလို႔မရဘူး။ အရင္က FSB ေတြအစား Quick Path Interface (QPI) နဲ႔ Direct Media Interface (DMI) ကုိအစားထိုးသံုးစြဲလာတယ္။
Gulftown
Gulftown ဟာ Core i7 family ထဲမွာအျမင့္ဆံုးလို့ဆိုႏိုင္တယ္။ စစဦးပိုင္းမွာ core i9 လို့ေခၚတြင္ေပမယ့္ ေနာက္ပိုင္းမွာ core i7 extreme edition အေနနဲ့ေရာင္းခ်တယ္။ သူမွာ core 6 ခုပါဝင္ျပီး Hyperthreading နည္းပညာကိုထည့္သြင္းထားတယ္။ ဒါေၾကာင့္ core တစ္ခုစီကို thread နွစ္ခုႏွဳန္းနဲ့ core 12 ခုစာအလုပ္လုပ္တယ္။ Nehalem Microarchitecture အစား Westmere Microarchitecture ကိုသံုးထားတယ္။ Process အားျဖင့္ 32nm ျဖစ္တယ္။ သူ့ကိုအဓိကအားျဖင့္ workstation ေတြနဲ့ extreme desktop system ေတြမွာသံုးတယ္။ socket က LGA 1366 ျဖစ္တယ္။ 

သူ့ကို Brand name အရ Core i7 9xx, Core i7 9xxX နဲ့ Xeon processor အတြက္ Xeon 36xx, Xeon 56xx တို့ျဖစ္တယ္ (xx သည္ speed ေပၚမွုတည္၍ နံပါတ္ေျပာင္းသည္ကိုဆိုလိုသည္။ L3 Cache က 12 MB ရိွတယ္။ Thermal Design Power (TDP) က 130 Watt ရိွတယ္။ L2 cache က core တစ္ခုစီကို 256MB ရိွတယ္။


Bloomfield
Bloomfield CPU ေတြက High end desktop ေတြအတြက္ရည္ရြယ္တယ္။ Core i7 CPU ေတြျဖစ္တယ္။ သူ့ကို Brand name အရ Core i7 9xx လို့ေပးထားတယ္။ သူက LGA 1366 socket MB ေတြမွာတပ္ဆင္ႏိုင္တယ္။ သူ့မွာ core ေလးခုပါဝင္တယ္။ On-die memory controller ပါဝင္လာျပီး memory က CPU နဲ့ တိုက္ရိုက္ခ်ိတ္ဆက္ျပီးအလုပ္လုပ္ႏိုင္တယ္။ ကၽြန္ေတာ္တို့ေတြ့ေနၾက FSB အစား Intel QuickPath Interface ကိုသံုးထားတယ္။ L1 cache မွာ instruction နဲ့ data အတြက္ core တစ္ခုကို 32KB စီပါဝင္တယ္။ L2 cache မွာ Instruction နဲ့ data အတြက္ နွစ္ခုေပါင္း 256 KB ကို core တစ္ခုစီအတြက္ထည့္ေပးထားတယ္။ L3 cache က 8MB ပါဝင္ျပီး CPU တစ္ခုလံုးအတြက္ ျဖစ္တယ္။ 

Single-die device ျဖစ္တယ္။ Core ၄ခု, Memory controller နဲ့ cache ေတြအားလံုးကို die တစ္ခုထဲမွာေပါင္းထည့္ထားတယ္။ Turbo boost technology ပါဝင္လာျပီးသူက core ေတြကို တစ္ဆင့္ကို 133MHz ႏွဳန္းနဲ့ အပူခ်ိန္နဲ့ voltage ကိုက္သည္အထိျမွင့္ေပးႏိုင္တယ္။ ဟိုးအရင္က CPU ေတြမွာအသံုးျပဳခဲ့တဲ့ Hyper Threading ကိုျပန္လည္သံုးထားတယ္။ ဒါေၾကာင့္ core တစ္ခုကို thread နွစ္ခုစီနဲ့ core 8 ခုပံုစံနဲ့အလုပ္လုပ္ႏိုင္တယ္။ ထုက္လုပ္မွဳပံုစံမွာ 45nm process ျဖစ္တယ္။ transistor ေပါင္း 731 Million ပါဝင္ၿပီး size က 263 mm2 ျဖစ္တယ္။

Lynnfield
Lynnfield အမ်ိဳးအစားေတြမွာ Corei7 နဲ့ Core i5 ေတြပါဝင္တယ္။ သူက Core ၄ ခုပါဝင္ျပီး LGA 1156 socket ကိုသံုးတယ္။ Brand name အရ Core i7 8xx, i7 8xxK, i7 8xxS , Core i5 7xx, i5 7xxS လို့သက္မွတ္ထားတယ္။ Xeon ေတြအတြက္ က 34xx ျဖစ္တယ္။ Nehalem Microarchitecture ကိုအေျခခံျပီး 45 nm process နဲ့ထုက္လုပ္တယ္။ သူမွာေတာ့ core i7 အတြက္ hyperthreading ပါဝင္ျပီး၊ Core i5 ေတြအတြက္ေတာ့ Hyperthreading ပါဝင္မလာဘူး။ Bloomfield i7 ေတြနဲ့ကြာျခားခ်က္ကေတာ့ LGA 1156 သံုးထားျပီး Quick path အစား direct media interface ကိုသံုးထားတယ္။ Lynnfield ေတြမွာ Direct Media Interface, Memory controller, PCI E links ေတြပါဝင္တယ္။ L2 cache က core တစ္ခုစီအတြက္ 256 KB နဲ့ L3 Cache က 8MB ပါဝင္တယ္။

Clarkfield
Clarkfield ေတြက Lynnfield ေတြရဲ့ mobile version ေတြျဖစ္ျပီးသူတို့ကို laptop, notebook စတာေတြမွာသံုးတယ္။ Clarkfield ေတြက mPGA 989 socket ကိုသံုးပါတယ္။ သူမွာေတာ့ core i7 ပဲရိွတယ္။ Brand name အရ Core i7 7xxQM, i7 8xxQM, i7 9xxXM Extreme Edition ေတြျဖစ္တယ္။ Nehalem Microarchitecture ကိုအေျခခံျပီး 45nm process နဲ့ထုက္လုပ္ထားတယ္။ L2 cache က core တစ္ခုစီအတြက္ 256KB ျဖစ္ျပီး L3 cache က i7 9xxXM အတြက္ 8MB နဲ့ 7xxQM, 8xxQM ေတြအတြက္ 6MB ျဖစ္တယ္။ သူ႔မွာလည္း DMI, PCI E links, Memory controller စတာေတြထည့္သြင္းထားတယ္။

Clarkdale
Clarkdate အမ်ိဳးအစားေတြက Core i5 နဲ့ core i3 CPU ေတြျဖစ္တယ္။ သူတို႔လည္းပဲ LGA 1156 ကိုသံုးတယ္။ Nahalem Microarchitecture ကိုအေျခခံျပီး 32 nm process နဲ့ထုက္လုပ္တယ္။ Core ကေတာ့ ၂ခုပဲပါဝင္တယ္။ Brand name အရ i3 5xx, i5 6xx တို့ျဖစ္တယ္။ Xeon အတြက္ကေတာ့ L340x ျဖစ္တယ္။ L2 cache က core တစ္ခုစီအတြက္ 256KB ရွိျပီး၊ L3 cache က 4MB ရိွတယ္။ သူ႔မွာလည္း Integrated graphic, memory controller, PCI Express links ေတြကိုထည့္သြင္းေပးထားတယ္။

Arrandale
Arrandale ေတြက Clarkdale ေတြရဲ့ mobile version ေတြျဖစ္တယ္။ သူ႔မွာေတာ့ Core i7, Core i5, Core i3 ေတြရိွတယ္။ သူကေတာ့ Westmere Microarchitecture ကိုအေျခခံျပီး 32nm process နဲ့ထုက္လုပ္တယ္။ socket က mPGA 989 ျဖစ္တယ္။ Brand name ေတြအားျဖင့္ i7 6xxUM, i7 6xxUE, i7 6xxLM, i7 6xxLE, i7 6xxM, i7 6xxE ေတြ၊ i5 5xxUM, i5 4xxM, i5 5xxM, i5 5xxE ေတြနဲ့ i3 3xxM တို့ရိွတယ္။ Core ၂ ခုပါဝင္ျပီး L2 cache က core တစ္ခုစီအတြက္ 256 KB ရိွတယ္။ L3 cache က i5 ေတြအတြက္ 3MB နဲ့ i7 ေတြအတြက္ 4MB ျဖစ္တယ္။ သူဟာလည္း Integrated Graphic, DMI, PCI E links ေတြပါဝင္ပါတယ္။


Core i family ကို code name ေတြနဲ့ရွင္းျပျပီးျပီး။ သူတို့ကို Brand name ေတြအရျပန္လည္ေဖာ္ျပေပးထားပါတယ္။
Credit : http://burmaitshare.blogspot.com

ကြန္ျပဴတာမွာဘာေတြလုပ္သြားလည္း ဆိုတာကိုျပန္စစ္ေပးႏိုင္တဲ႕ - QFX KeyScrambler Premium v3.3.0.4 + Patch

AP6wM 
မိမိကြန္ျပဴတာမွာ ဘာေတြလုပ္သြားလည္း ဆိုတာကိုျပန္စစ္ေပးႏိုင္တဲ႕ Software ေလးတစ္ခုမွ်ေ၀ေပး လိုက္ ပါတယ္ဗ်ာ။ QFX KeyScrambler Premium v3.3.0.4 ကေတာ႕ေနာက္ဆံုးထြက္ Version ေလးပါဒီေကာင္ေလး က Keyboard ေပၚမွာရိုက္ထားသမွ် စာလံုးအားလံုးကုိ မွတ္ထားေပးႏိုင္ပါတယ္။ ဒီေလာက္ဆိုရင္ေတာ႕ ဘယ္လိုေနရာမ်ိဳးေတြမွာအသံုးျပဳႏိုင္သလည္းဆိုတာကို သေဘာေပါက္ေလာက္ျပီထင္ပါတယ္ဗ်ာ။ ဒါေပမယ္႕ Keylogger နဲ႕မတူဘူးေနာ္။ ဒါေပမယ့္ Keylogger လုပ္ေဆာင္ခ်က္နဲ႕ေတာ့ ေတာ္ေတာ္မ်ားမ်ားတူပါတယ္ဗ်ာ။ အျမဲတမ္းသံုးႏိုင္ေအာင္ Patch File ကိုပါထည္႕ေပးထားပါတယ္ဗ်ာ။32bit ေရာ 64bit ႏွစ္မ်ိဳးစလံုးမွာ အသံုးျပဳႏိုင္ပါတယ္ဗ်ာ။
 

KeyScrambler encrypts your keystrokes in the kernel and decrypts it at the destination application, leaving Keyloggers with indecipherable keys to record. For your personal office, family, and business, KeyScrambler adds a reliable layer of defense. It works even on security compromised computers. It is compatible with other security programs and authentication methods such as tokens and smart cards. It requires no effort on your part and lets you see encryption live. For web browsing + work + play. KeyScrambler Pro protects all your inputs in IE, Firefox, Opera, and Flock, and nearly 80 other browsers and apps: Popular Browsers; Email Clients; IM/VoIP Clients; Password Managers; Zip Programs; Online Games; New! Text Editors.
Premium:
The most complete protection.
If you work in public places often, use the information-sensitive applications a lot, or own a business, KeyScrambler Premium is what you need. KeyScrambler Premium starts the minute you turn on your computer and protects all your inputs in over 170 browsers and applications, adding a unique line of defense to your PC security system against online information theft.

 **  Step-1.ေအာက္က Download Button ကိုႏွိပ္လိုက္ပါ  
**  Step-2. "5sec". ေလာက္ေစာင္႕ေပးပါ။

**  Step-3. "  << SKIP AD >>   ".ကိုႏွိပ္ေပးပါ။
**  Step-4. Download Link က်လာပါလိမ္႕မယ္။
**  အဆင္ေျပပါေစဗ်ာ။

FaceBook အေကာင္. ကုိ Browser မသုံးပဲ ID နဲ. ေဖာက္မယ္


FaceBook အေကာင္. ကုိ Browser မသုံးပဲ ID နဲ. ေဖာက္မယ္.....

(မသိေသးတဲ.သူငယ္ခ်င္းေတြအတြက္ပါ)

ကြ်န္ေတာ္လုပ္တာေတာ. 100% ရပါတယ္

ဖုန္းနံပတ္လည္းမေတာင္းပါဘူး

အေကာင္.တစ္ခုျပီးတစ္ခုေဖာက္လုိ.လည္းရပါတယ္

Gmail အေကာင္.မရွိလည္းေဖာက္လုိ.ရပါတယ္

လုိအပ္တာကေတာ.........

Phone setting >>Manange Application>>Facebook

ကုိ ( clear data ) လုပ္ရပါမယ္

ေနာ္တစ္ခုကေတာ. မိမိဖုန္းမွာ Browser ႏွစ္ခုရွိထားရပါမယ္

Send code ေတာင္းတဲ.အခါမွာ မိမိ Mail ထဲမွ Code နံပက္ကုိ

ရုိက္ထည္.ေပးရပါမယ္

Mail ထဲမွာ တုိက္ရုိက္ ျပဳလုပ္လုိ.မရပါ

ေအာက္မွာ ပုံနဲ.တကြ ရွင္းျပေပးထားပါတယ္


အဆင္မေျပရင္ comment ေပးခဲ.ပါ

အဆင္ေျပခဲ.ရင္ေတာ. Share လုပ္ေပးျခင္းျဖင္.ကူညီပါ

ျဖန္.ေ၀ေပးပါ ကုိလုိအခက္ခဲရွိတဲ.သူေတြကုိစာနာေပးပါ

MMUG က အကုိဆရာေတြအားလုံးကုိ ေက်းဇူုးအထူးတင္ပါသည္

Credit to Soe Yeyint

ျမန္မာျပည္သား/ သူ ေတြ ကိုယ္စား ေက်းဇူးတင္ပါတယ္ Soe Yeyint

ကိုလတ္(ကြ်ဲဆင္း)