Samsung Galaxy Ace Plus S7500 ကို Android 4.2.1 Jellybean တင္ရေအာင္

ေဇာ္ေဇာ္ထက္ း အကိုေပါက္ေရ…
သူမ်ားေတြေတာင္းသလို က်ေတာ္လည္းတစ္ခုေလာက္ေတာင္းခ်င္တယ္
samsung glaxy series ခ်င္းအတူတူ
aceတို႔ ace 2တို႔က jelly beanရျပီး က်ေတာ္တို႔ ace plus(s7500)ေကာjelly တင္ လို႔မရဘူးလား
သူမ်ားေတြဖုန္းကို jelly ေက်ြးေတာ့ က်ေတာ္လည္းေက်ြးခ်င္တယ္ဗ်ာ
ace plus အတြက္ jelly bean ရမယ္ဆိုရင္ တင္ေပးပါဦးခင္ဗ်ာ
ကိုေပါက္ကို အစဥ္အားေပးလ်က္……
****
Samsung Galaxy Ace Plus S7500 မွာ Jelly Bean 4.2.1 Version ေလးနဲ႕ လန္းခ်င္ပါတယ္ဆိုသူမ်ားအတြက္ တင္ေပးလိုက္ပါၿပီဗ်ာ...
လိုအပ္တဲ့အခ်က္အလက္ေတြကေတာ့
(၁) CWM Recovery Mode သြင္းရပါမယ္
(၂) ေနာက္ဆံုးအဆင့္ Jelly Bean 4.2 သို႕ အဆင့္ျမင့္တင္ျခင္း ျဖစ္ပါတယ္... ဒီအခ်က္အလက္ေတြကိုမျပဳ
လုပ္ခင္မွာ မိမိဖုန္းရဲ႕ အေရးၾကီးတဲ့ Message ေတြ.. Contact ေတြ ကိုေသခ်ာမွတ္ထားပါ.. SD Card ထဲက
အေရးၾကီးတဲ့ Data ေတြကို ကူးယူထားပါ။ ဘာလို႕လဲဆိုေတာ့ SD Card ကို လံုး၀ Format ရိုက္ရမွာမလို႕ပါ..
ကဲ စပါမယ္.. SD Card ကို Format ရိုက္လိုက္ပါ.
CWM Recovery Mode သြင္းရပါမယ္
အရင္ဆံုး ဒီမွာ လိုအပ္တဲ့ ဖိုင္ကို Download ရယူပါ.. SD Card ထဲမွာ CMW Recovery ဆိုၿပီး Folder တစ္ခုေဆာက္လိုက္ပါ.. Download ရလာတဲ့ဖိုင္ကို CMW Recovery Folder ထဲသို႕ ကူးထည့္ပါ..
ပီးတာနဲ႕ ဖုန္းကို ျပန္ပိတ္လိုက္ပါ.. .ၿပီးတာနဲ႕ Power ခလုပ္ + Volume Down + Home Button ကိုတစ္ျပိဳင္
တည္းဖိလိုက္ပါ.. ပါ၀ါ စပြင့္လာၿပီဆိုတာနဲ႕ Power ခလုပ္ကို လႊတ္ေပးလိုက္ပါ Volume Down + Home Buttonကိုေတာ့ ငါး စကၠန္႕ေလာက္ၾကာေအာင္ ဖိထားၿပီး လႊတ္ေပးလိုက္ပါ.. Recovery Mode ထဲသို႕ ေရာက္သြားပါလိမ့္မယ္...ၿပီးတာနဲ႕ Apply SDcard:Update.zip ကို Volume Key မ်ားအသံုးျပဳၿပီး ေရႊ႕လိုက္ပါ..ၿပီးတာနဲ႕ Home Button ခလုပ္ကို ႏွိပ္ၿပီး CMW Recovery Folder သို႕၀င္ကာ Download ရယူထားတဲ့ ဖုိင္ကို Home Button အသံုးျပဳကာ Update လုပ္လိုက္ပါ..ၿပီးတာနဲ႕ Power ခလုပ္ကို ႏွိပ္ကာ ျပန္ထြက္ပါ reboot system now ကိုေရြးခ်ယ္ေပးလိုက္ပါ.စက္ျပန္တက္လာတာနဲ႕ CWM Recovery Mode သြင္းျခင္း ပီးဆံုးပါၿပီ...
ေနာက္ဆံုးအဆင့္ SlimBean 4.2 သို႕ အဆင့္ျမင့္တင္ျခင္း ျဖစ္ပါတယ္..
SD Card ထဲမွာ JellyBean ဆိုၿပီး ဖုိလ္ဒါ အသစ္တစ္ခုထပ္ေဆာက္လိုက္ပါ.. Jelly Bean Zip ကို ဒီမွာ Downloadရယူပါ.. ရလာတဲ့ဖိုင္ကို JellyBean ဆိုတဲ့ ဖိုလ္ဒါထဲသုိ႕ထည့္လိုက္ပါ.. အား
လံုးၿပီးဘီဆိုတာနဲ႕ ဖုန္းရဲ႕ပါ၀ါကို လံုး၀ပိတ္လိုက္ပါ..
ဖုန္းကို ပါ၀ါပိတ္လိုက္ပါ..ပီးတာနဲ႕ Power ခလုပ္ + Volume Down + Home Button ကိုတစ္ျပိဳင္
တည္းဖိလိုက္ပါ.. ပါ၀ါ စပြင့္လာၿပီဆိုတာနဲ႕ Power ခလုပ္ကို လႊတ္ေပးလိုက္ပါ Volume Down + Home Buttonကိုေတာ့ ငါး စကၠန္႕ေလာက္ၾကာေအာင္ ဖိထားၿပီး လႊတ္ေပးလိုက္ပါ.. CWM Recovery Mode ထဲသို႕ ေရာက္သြား ပါ လိမ့္မယ္.. ထို႕ေနာက္ Wipe data/Factory reset ဆိုတာကိုေရြးခ်ယ္ပါ..
Complete ျဖစ္သြားတာနဲ႕ Power Button ကိုႏွိပ္ၿပီး ျပန္ထြက္ပါ...ထို႕ေနာက္ Wipe cache ကိုေရြးခ်ယ္ပါ.
Complete ျဖစ္သြားတာနဲ႕ Power Button ကိုႏွိပ္ၿပီး ျပန္ထြက္ပါ..Complete ျဖစ္သြားတာနဲ႕ Power Button ကိုႏွိပ္ၿပီး ျပန္ထြက္ပါ..
ထို႕ေနာက္ Flash ZIP From SD Card >>> Choose ZIP From SD Card ကိုေရြးခ်ယ္ၿပီး SD Card
ထဲက Jelly Bean Folder ထဲက Download ရယူၿပီး ထည့္ထားတဲ့ဖိုင္ကို Install လုပ္ေပးပါ... မိနစ္အနည္း
ငယ္ေစာင့္ပါ..Complete ျဖစ္သြားတာနဲ႕ Power Button ကိုႏွိပ္ၿပီး.. Reboot system now ကိုႏွိပ္ေပး
လိုက္ပါ.. စကၠန္႕အနည္းငယ္ေစာင့္ၿပီး ျပန္တက္လာတာနဲ႔မိမိရဲ႕ဖုန္းေလးဟာ Jelly Bean Version 4.2 ေလးနဲ႕လန္းသြားတာ ကိုေတြ႕ရပါလိမ့္မယ္ခင္မ်ာ...
Galaxy Note N7000 ကို Android 4.2.2 ParanoidAndroid Jelly Bean ROM တင္နည္း

ကဲ ဒီတစ္ခါကေတာ့ Galaxy Note N7000 အတြက္
4.2.2 jelly ေလးပါဗ်ာ .. ဘယ္လိုျပန္တင္ရမယ္ဆိုတာကေတာ့
အရင္တင္ေနၾကအတိုင္းပါဘဲ အရင္ဆုံး လိုတာကို Download ယူ
ၿပီးရင္ ZIP ကို ျပန္မေျဖဘဲနဲ႔ SD ကဒ္ထဲကိုထည့္... ဖုန္းကို အရင္ဆုံး CWM တင္ ၿပီးရင္ဖုန္းကို Recover Mode ထဲကို၀င္ Wipe Data/Factory Reset ရယ္
အရင္လုပ္ ၿပီးရင္ Rom ကို Install လုပ္ Reboot System Now နဲ႔ Reboot
ျပန္တက္ တူတူပါဘဲေအာက္မွာဆက္ေလ႔လာၾကည့္ပါဗ်ာ အားလုံးအဆင္ေျပၾကပါေစေနာ္..
Install Android 4.2.2 Jelly Bean Update on Galaxy Note N7000 with ParanoidAndroid 3.10 ROM
Step 2 - Connect and mount the Galaxy Note USB mass storage on computer with the USB cable.
Step 3 - Without extracting, copy the downloaded ParanoidAndroid ROM zip files to the phone's SD card.
Step 4 - Then switch off the phone and disconnect its USB cable from computer.
Step 5 - Boot the phone into Recovery Mode by pressing and holding Volume Up, Home and Power buttons together.
Step 6 - Once the device enters ClockworkMod Recovery, do a full data wipe by choosing Wipe Data/Factory Reset. NOTE: Use Volume buttons to navigate and Power button to select an option in Recovery.
Step 7 - Perform Wipe Cache Partition and then do Wipe Dalvik Cache. Dalvik Cache wipe is essential to prevent boot loops or any other errors. To do so, choose Advanced in CWM recovery and then click Wipe Dalvik Cache.
Step 9 - Return to the main recovery screen and tap on Install Zip from SD card.
Step 10 - Click Choose Zip from SD card. Use Volume keys to navigate to the ParanoidAndroid 3.10 ROM zip file that you copied earlier to the phone's SD card and select it by tapping the Power button. Confirm the ROM installation on next screen and the installation process should begin.
Step 11 - Once both the ROM is installed, choose "+++++Go Back+++++" and hit Reboot System Now in the recovery menu. The phone will reboot automatically and the first boot may take about 5 minutes to complete. So, please be patient.
Galaxy Note N7000 is now running the latest Android 4.2.2 ParanoidAndroid Jelly Bean ROM onboard. Go to Settings > About Phone to verify the firmware version installed.
Samsung Galaxy Gio GT-S5660 ကို CM9 အသံုးျပဳျပီး ICS (သို ့မပာုတ္) ဂ်ယ္လီ ) သို ့ျမင့္တင္နည္း

AungMin: Samsung Gio S5660 ကုိ Version ၿမွင့္လုိ့ရရင္ ေက်းဇူးၿပဳၿပီးတင္ေပးပါလားခင္ဗ်ာ..
AungMin ရဲ႕ ေမးခြန္းကို ေျဖဖို႔လိုက္ရွာရင္းေတြ႕လာလို႔ ျပန္လည္ မွ်ေ၀လိုက္ပါတယ္..
အဆင္ေျပပါေစ...
***********************************************
အရင္ ဦးဆံုး ဒီေကာင္တင္ရင္ ဘာေတြ ရမယ္ ဘာေတြလိုအပ္လဲတစ္ခ်က္ေလာက္ၾကည့္
ၾကရေအာင္
Working
boot
GSM (phone/messages/GPRS/EDGE/3G)
Wifi
Bluetooth
HW acceleration (full)
Sound
Headphones
GPS
All sensors (proximity, roration etc)
CyanogenMod settings (not all, it’s not fully merged by CyanogenMod team, not my fault)
Market (now you can download all apps available for Gio with GB)
Fixed animations (now it looks so good)
Facebook sync
Buttons backlight
BLN support
GMail fully works
Browser fully works
ICS keyboard
Games – works as smoothly as on Gingerbread
YouTube
Camera – only photos, without preview
Deep sleep
Wifi signal indicator
Native Android mass storage
Without flickering
လိုအပ္ခ်က္ေတြက
Rooted Samsung Galaxy Gio GT-S5660 (See our guide on how to root the Samsung Galaxy Gio GT-S5660)
Fully charged battery or at least 70% battery left
ကဲ အဲတာေတြဖတ္ျပီးတင္ခ်င္တယ္ဆိုရင္ ICS တင္မလား ဂ်ယ္လီေၾကြးမလား ဆံုးျဖတ္ျပီးေအာက္ကနည္းအတိုင္းတ
ပထမဦးဆံုး rom ကိုတင္ႏိုင္ဖို ့အတြက္ CWM တင္ရပါ့မယ္
CWM တင္မယ္ဆိုရင္ root လုပ္ထားဖို ့လိုအပ္ပါတယ္ အရင္က CWM တင္ျပီးသားဆိုရင္ ေတာ့ ဒီအဆင့္ကိုေက်ာ္သြားႏိုင္ပါတယ္
တင္မယ္ဆိုရင္ေတာ့ CWM ကို ေဒါင္းလုပ္လုပ္ပါမယ္
(px-cwm-v2.zip, 7.13 MB)
ဖုန္းရဲ ့ပါ၀ါကို အရင္ပိတ္ပါ recovery mode တင္ဖို ့အတြက္ ကၽြန္ေတာ္ေျပာတဲ ့ကီးေလးေတြကိုႏိွပ္ပါမယ္
holding down the Home/OK (middle) button as you turn on the phone using the Power button. In recovery mode, use the Volume buttons for navigation and the Home/OK button for selecting ပါ
recover တက္လာျပီဆိုရင္ ေတာ့
Install zip from sdcard > Choose zip from sdcard, selectpx-cwm-v2.zip, and confirm that you want to flash the file. Reboot your phone afterwards အဲတိုင္းလုပ္ေပးလိုက္ပါ ok ေနာ္
အဲတာေတြျပီးသြားျပီဆိုရင္ မိမိဖုန္းမွာ CWM တက္ပါျပီ အဲတာ ဆိုရင္ေတာ့ ROM တင္ဖို ့အပိုင္းကိုဆက္သြားၾကတာေပါ့
ROM ကိုေဒါင္းပါ့မယ္ ေအာက္ကလင့္ကေနေဒါင္းပါ
ဒါကေတာ့ ဂ်ယ္လီ Rom လင့္ပါ
ဒါကေတာ့ ေရခဲ ့မုန္ ့rom လင့္ပါ
ၾကိဳက္တဲ ့rom ကိုတင္ႏိုင္ပါတယ္ နည္းကေတာ့အတူတူပါဘဲ
Rom ရလာျပီဆိုရင္ zip ကို sd ကတ္ထဲ ကိုထည့္ေပးျပီးဖုန္းကိုပိတ္လိုက္ ပါ အေပၚကနည္းအတိုင္း သက္ဆိုင္ရွာ အလုပ္ေတြကိုႏွိပ္ျပီး CWM တက္လိုက္ပါ
CWM ထဲေရာက္သြားရင္ select Install zip from sdcard > Choose zip from sdcard, select the ROM package file, and confirm that you want to flash the file. It may take 5-10 minutes for the installation process to finish.
အားလံုးျပီးရင္ main recovery menu ကိုျပန္ထြက္လိုက္ပါ
ျပီးရင္ “Wipe data / factory reset“ လုပ္ျပီး “Go Back နဲ ့ထြက္လိုက္ပါ
“Reboot system now” လုပ္လိုက္ရင္ဖုန္းက ျပန္ပိတ္သြားျပီျပန္တက္လာပါလိမ္
့မယ္
အဲတာဆိုရင္ေတာ့ သင္ စိတ္ၾကိဳက္တင္ထားတဲ ့ ေရခဲမုန့္ (သို ့မပာုတ္ ) ဂ်ယ္လီေလးနဲ ့ေပ်ာ္ရြင္ႏိုင္ပါျပီဗ်ာ တိန္ တိန္
ကိုေက်ာ္ကိုကို(myanmarplay)
Samsung wave2 GT-S8530 bada 2.0 firmware

samsung wave2 GT-S8530 ကို Bada 2.0 တင္ခ်င္ပါတယ္ဆိုတဲ႔ ကိုေက်ာ္စြာနဲ႔အတူးအားလုံးအဆင္ေျပဖို႔
ျပန္တင္ေပးလိုက္ပါတယ္ဗ်ာ နည္းနည္းၾကာသြားတာကိုနားလည္ေပးပါ..ကဲအရင္ဆုံးေအာက္မွာေဒါင္းပါ
ၿပီးရင္ ေဒါင္းထားတာကို Folder တစ္ခုထဲမွာ အကုန္ထည့္ထားလိုက္ပါ ၿပီးရင္ Zip ေတြကိုျပန္ေျဖလိုက္ပါ
ၿပီးရင္ PC မွာ Driver တင္ထားပါ.. Driver လည္းသိၿပီဆိုရင္ ဖုန္းကိုပိတ္လိုက္ပါ ဖုန္းကိုပိတ္ၿပီးရင္
Vol Down + Home + Power နဲ႔ Download Mode ကို ၀င္လိုက္ပါ Vol Up ကိုထပ္ႏွိပ္ေပးပါ..
ၿပီးရင္ ေဒါင္းလို႔ရလာတဲ႔ MultiLoader_V5.65.ZIP ကိုျပန္ေျဖလို႔ရတဲ႔ MultiLoader_V5.65.exe ကို PC မွာ
Run ပါ...MultiLoader_V5.65 ရဲ႕ Control Box ရဲ႕ေအာက္မွာ LSI ကို ေရြးေပးပါ..Boot Change ရဲ႕ေရွ႕မွာ
အမွန္ျခစ္ထည့္ေပးပါ..ၿပီးရင္ FullDownload ရဲ႕ေရွ႕မွာ အမွန္ျခစ္ထည့္ေပးပါ....Boot ကိုႏွိပ္ၿပီးေတာ့
samsung wave2 GT-S8530 bada firmware.zip ကိုျပန္ေျဖလို႔ရတဲ႔ Folder ထဲက BOOTFILES ဆိုတာကို
Folder လိုက္ေရြးေပးလိုက္ပါ...ၿပီးရင္ Zip ကိုျပန္ေျဖလို႔ရလာတဲ႔ Folder ထဲက ေနၿပီးက်န္တာေတြကိုေရြးပါ..
- Click AMSS and select “amss.bin” file.
- Click APPS and select “apps_compressed.bin”.
- Click RSRC1 and select “Rsrc_S8530_Open_Europe_Common.rc1”.
- Click RSRC2 and select “Rsrc2_S8530(Mid).rc2”.
- Click FACTORY FS and select “FactoryFs_S8530_Open_Europe_Common.ffs”.
- Click CSC and select “CSC_S8530_Open_Europe_Common_OXA_KH3.csc”.
- Click SHP button and select “ShpApp.app”.
ၿပီးရင္ MultiLoader ကေနၿပီးေတာ့ဖုန္းကိုတြဲထားတဲ႔ Post ကိုရွာပါလိမ္႔မယ္ သိၿပီဆိုရင္ Download ကိုႏွိပ္ပါ..
Firmware ကို ျပန္တင္ေနတာကိုၾကည့္ေနလိုက္ပါ...Complete ျဖစ္သြားၿပီဆိုရင္ ဖုန္းကို PC နဲ႔တြဲထားတာကို
ျပန္ျဖဳတ္လိုက္ပါ...ဖုန္းက Reset က်သြားပါလိမ္႔မယ္..ျပန္တက္လာရင္ေတာ့ ဖုန္းက Bada 2.0 နဲ႔လန္းေနပါၿပီ

As this is not the Official Bada 2.0, there are some bugs as is to be expected. After Flashing your device you need to change some setting to avoid some hiccups in the user experience. To avoid some of these problems, you just have to follow these few steps:
- Go to PreConfig by pressing *#5239870*# on your phone’s keypad.
- Select “Pre Config”.
- Password is *#27236*#.
- And select “DBT”.
- Now your phone will restart again.
- After restarting this is the last step you must do: dial *#33284*# and select debug level to “low”.
- Your phone will restart again and maybe the language
is changed too. Change the language back to English and your are
done.Congratulations, you have now successfully installed Bada 2.o
operating system on your Wave II mobile phone.
samsung wave2 GT-S8530 bada firmware(mediafire)
Samsung Wave 2 GT-S8530 bada firmware (Solidfiles)
MultiLoader_V5.65
STune
Default Team ကိုေျပာင္းခ်င္တယ္ဆိုရင္ေတာ့ ေအာက္မွာေလ႔လာလိုက္ပါဗ်ာ
- First of all, download the themes you like for your phone. Make sure the extension is “.smt”. A simple google search will land you 10′s of themes for Bada 2.0.
- Download STune
- Connect your phone with your PC in Kies mode (Kies is necessary for Drivers, otherwise your computer will not recognise your phone).
- Now start STune and select Samsung Mobile USB Modem.
- Select Browser Tab.
- Now select AppEx, it will expand like a tree.
- Select User > Theme > Download. See the image below
- Now Drag “.smt” file to the RHS of the Stune (under Files section).
- Unplug the device and go to Settings > Display > Theme.
- You will see new themes that you just added, apply the desired theme and enjoy.

Let us know how it went. If you face any problems, don’t hesitate to let us know in the comments below.
အားလုံးအဆင္ေျပၾကပါေစဗ်ာ.......
Lock iPhone အတြက္ Baseband မေျပာင္းလဲပဲ iOS 6.1 သို ့ Update လုပ္ယူနည္း
iPhone ရဲ ့ iOS မွာ ယခုဆိုရင္ iOS 6.1.2 ကိုေရာက္ရွိသြားပါၿပီ၊ သို ့ေပမယ့္ Lock iPhone ကို အသံုးျပဳမိေနတဲ့ မိတ္ေဆြမ်ားကေတာ့ iOS version ျမင့္တိုင္း ထပ္ၾကပ္မကြာ update မလုပ္ႏိုင္ၾကပါဘူး။
Baseband ကန္ ့သတ္ခ်က္ေၾကာင့္ Jailbreak လုပ္ႏိုင္ခဲ့ရင္ေတာင္ Unlock လုပ္ႏိုင္ဖို ့ ေစာင့္ေမွ်ာ္ေနၾကရပါတယ္။ ဒါ့အျပင္ iOS update လုပ္ရာတြင္လည္း အနည္းငယ္ အခက္အခဲေလးေတြ ရွိေနတတ္ပါတယ္..
Lock phone မ်ားျဖစ္ၾကေသာ iPhone 4, 3G, 3Gs သမားမ်ားအတြက္ မိမိတို ့၏ Unlock-able baseband ကို မေျပာင္းလဲေစပဲ iOS 6.1 ကို လံုၿခံဳစိတ္ခ်စြာ update လုပ္ႏိုင္မယ့္နည္းလမ္းေလးကို ေဖာ္ျပေပးလိုက္ပါတယ္။
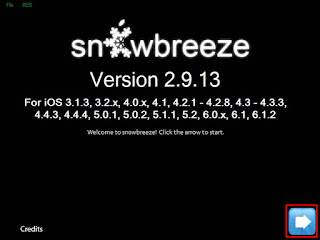
ထံုစံအတိုင္း preserved baseband iOS တစ္ခုကို တည္ေဆာက္ဖို ့ အၿမဲတမ္းအသံုးျပဳေနရတဲ့ "sn0wbreeze" ကိုပဲ အသံုးျပဳၾကရပါလိမ့္မယ္။
**sn0wbreeze ကို အသံုးမျပဳမီ သိသင့္သိထိုက္ေသာ အခ်က္မ်ား**
- iPhone 3Gs အတြက္ 05.11.07, 0.5.12.01, 05.13.04, 06.15.00 ၊ iPhone 4 အတြက္ 01.59.00 baseband မ်ားကိုသာ preserved လုပ္ေပးႏိုင္ပါမည္။
- မိမိ၏ iPhone baseband သည္ အထက္ပါတို ့ထဲမွ တစ္ခုခုႏွင့္ လက္ရွိတြင္ ကိုက္ညီမႈရွိေနရပါမည္။ သို ့မွသာ iOS 6.1 သို ့ update လုပ္ႏိုင္ပါလိမ့္မည္။
- မိမိ၏ iPhone baseband ကို စစ္ေဆးရန္ Settings -> General -> About မွ "Modem Firmware" ကို ၾကည့္ရမွာျဖစ္ပါတယ္။
>> Download sn0wbreeze 2.9.13
>> Download iOS 6.1 IPSW
sn0wbreeze 2.9.13 သည္ လက္ရွိမွာ ေနာက္ဆံုး version ျဖစ္ၿပီး iOS 6.1.2 ထိ bsaeband preserved လုပ္ေပးႏိုင္ပါတယ္၊ ဒါေပမယ့္ Unlock အတြက္ အသံုးျပဳရမယ့္ "ultrasn0w" က iOS 6.1 ထိသာ unlock လုပ္ေပးႏိုင္ေသးတာေၾကာင့္ iOS 6.1 ကို Update လုပ္နည္းသာ တင္ျပေပးလိုက္ပါတယ္။
လုပ္ငန္းစဥ္
အဆင့္ ၁)
မိမိ iPhone ႏွင့္ သက္ဆိုင္ေသာ "iOS 6.1 IPSW" ႏွင့္ "sn0wbreeze" တို ့ကို ဦးစြာ download ရယူထားပါ။
အဆင့္ ၂)
sn0wbreeze ကို Run ပါ။ "OK" ႏွိပ္ၿပီး "Next" (အျပာေရာင္ျမွား) ကို ဆက္ႏွိပ္ပါ။
အဆင့္ ၃)
"Browse for an IPSW" (အျပာေရာင္) ကို ႏွိပ္၍ အေပၚတြင္ download ရယူခဲ့ေသာ iOS 6.1 IPSW ကို ေရြးေပးလိုက္ပါ။
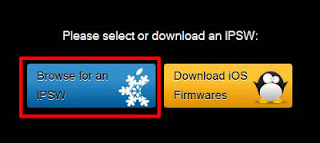
ဤေနရာတြင္ ကၽြန္ေတာ္က iPhone 3Gs ကို အသံုးျပဳၿပီး ျပသထားပါတယ္
အဆင့္ ၄)
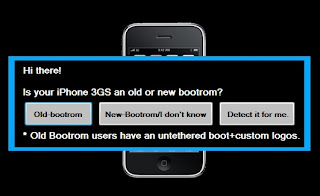
iPhone 3Gs အတြက္ ေရြးစရာ (၃)ခုရွိပါတယ္၊ မိမိ၏ bootrom ကို သိရင္ (Old/New) ေရြးေပးပါ။ မသိရင္ "Detect it for me" ႏွိပ္ပါ။ Detect လုပ္ၿပီးလို ့ Old/New သိရင္ သက္ဆိုင္ရာကို ေရြးေပးပါ။
အဆင့္ ၅)
sn0wbreeze မွ iOS 6.1 ကို Verified လုပ္ပါမည္။

အဆင့္ ၆)
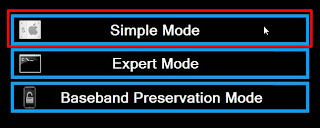
ဤအဆင့္တြင္ "Simple" mode ကိုသာ ေရြးပါ။
အဆင့္ ၇)
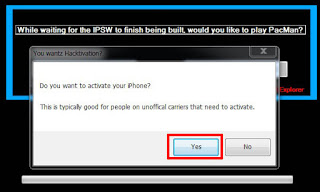
"Activate" လုပ္ရန္ ေမးလာပါလိမ့္မည္ "Yes" ကိုႏွိပ္ပါ။
အဆင့္ ၈)
sn0wbreeze မွ iOS 6.1 အတြက္ preserved လုပ္ၿပီးသား firmware အသစ္တစ္ခု ေဆာက္ေနပါၿပီ။

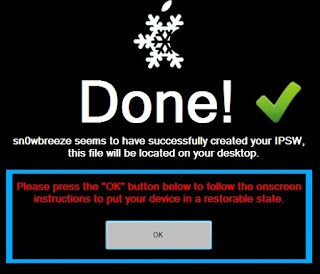
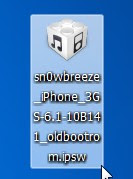
အဆင့္ ၉)
ေအာင္ျမင္စြာ ေဆာက္ၿပီးေၾကာင္း message ေပၚလာပါမည္။ "OK" ႏွိပ္ပါ။ မိမိ၏ Desktop တြင္ ပံုပါအတိုင္း "sn0wbreeze_iPhone_xx_6.1-xxxx" file တစ္ခုကို ရရွိလာပါလိမ့္မည္။ (ထို file ကို iTunes ႏွင့္ Custom Restore လုပ္ေသာ အဆင့္တြင္ အသံုးျပဳရန္ျဖစ္သည္)
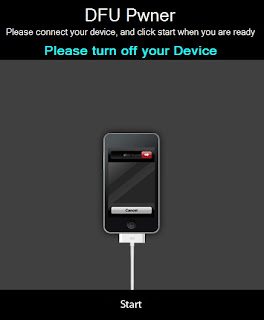
အဆင့္ ၁၀)
sn0wbreeze က သင့္ iPhone ကို DFU mode ဝင္ရန္ ညႊန္ၾကားပါလိမ့္မည္။ iPhone ကို PC ႏွင့္ ခ်ိပ္ဆက္ၿပီးေနာက္ ညႊန္ၾကားခ်က္အတိုင္း ကြက္တိ လုပ္ေဆာင္ပါ။ ေအာင္ျမင္ပါက သင့္ iPhone DFU mode သို ့ ေရာက္သြားပါမည္။
အဆင့္ ၁၁)
iTunes တက္လာၿပီး "Restore" လုပ္ရန္ ညႊန္ၾကားလာပါလိမ့္မည္။ Custom Restore လုပ္ရန္ (Shift key + Restore) ကို ႏွိပ္ၿပီး အဆင့္ (၉) တြင္ ရရွိထားေသာ IPSW file ကို ေရြးေပးလိုက္ပါ။
Restore လုပ္ငန္းစဥ္ ေခ်ာေမာစြာၿပီးစီးသြားပါက Baseband preserved လုပ္၍ iOS 6.1 သို ့ Update လုပ္ျခင္း ေအာင္ျမင္စြာ ၿပီးဆံုးသြားပါၿပီ။
**မွတ္ခ်က္** အထက္ပါ အဆင့္မ်ား ေအာင္ျမင္စြာ ၿပီးစီးသြားေသာ္လည္း သင့္ iPhone သည္ Jailbreak မျဖစ္ေသးသလို Unlocked လဲ မျဖစ္ေသးပါ။
>> iPhone ကို iOS 6.1 Jailbreak လုပ္ေဆာင္ရန္ ဤေနရာတြင္ ဖတ္႐ႈပါ...
>> Jailbreak လုပ္ၿပီးေနာက္ Unlock လုပ္ရန္ ဤေနရာတြင္ ဖတ္႐ႈပါ...
မိုးသိႀကားရဲ႔ပို႔စ္ေတြကို တိုက္ရိုက္မွ်ေ၀တာျဖစ္ပါတယ္..
မိုးသိၾကားကို ေက်းဇူးတင္ပါတယ္
Samsung Glaxy S i897 ကို Android 4.0.3 ICS RC 4.2 ျမွင့္ရေအာင္

cmpunk1989 ေရ.. ကၽြန္ေတာ္ ေလ့လာမိသေလာက္ ရွာေဖြ တင္ေပးလိုက္ပါတယ္..
သတိေပးခ်င္တာက Firmware တင္ရမွာျဖစ္တဲ့အတြက္ ေနာက္ဆက္တြဲျပႆနာေတြ ဘယ္လိုျဖစ္မလဲဆိုတာ ႀကိဳတင္မသိႏိုင္ပါဘူး.. ကၽြန္ေတာ္ ေပးတဲ့နည္းကိုလုပ္လိုက္တာ ျပႆနာတက္သြားတယ္ဆိုရင္ ကၽြန္ေတာ္လည္း မေကာင္းဘူးေလေႏွာ.. ဒီေတာ့ ျဖစ္လာတာကို လက္ခံဖို႔ အဆင္သင့္ရွိတယ္ဆိုမွသာ လုပ္ေစခ်င္ပါတယ္..
စိတ္မခ်ရင္ ကၽြန္ေတာ့္ထက္ ပိုမိုကၽြမ္းက်င္တဲ့ ပညာရွင္တစ္ေယာက္ေယာက္နဲ႔ တိုင္ပင္ၾကည့္ပါ.. ကၽြန္ေတာ္ ေလ့လာမိတဲ့နည္းေလးကို ျပန္လည္ မွ်ေ၀လိုက္ပါတယ္.. နည္းက (၂)နည္းရွိပါတယ္.. Online ကေန Kies ကိုသံုးၿပီး Upgrade လုပ္တာရယ္.. ေနာက္တစ္နည္းက Firmware ကိုေဒါင္းၿပီး Manual နည္းနဲ႔ ျပန္တင္ျခင္းျဖစ္ပါတယ္.. ပထမနည္းက အဆင္မေျပတာမ်ားတယ္လို႔သိရပါတယ္.. ဒါေၾကာင့္ ဒုတိယနည္းကို တင္ေပးလိုက္ပါတယ္..
Firmware မတင္ခင္ အစ္ကို႔ရဲ႕ဖုန္းကို Root ေဖါက္ထားဖို႔ လိုပါတယ္..
1.ပထမဆံုး ေအာက္ကလင့္မွာ Android 4.03 RC 4.2 ကို အရင္ေဒါင္းလိုက္ပါ..
Download Android 4.03 RC 4.2
2. ေဒါင္းလို႔ရလာတဲ့ဖိုင္ ကြန္ပ်ဴတာမွ တစ္ဆင့္ Card Reader နဲ႔ပဲျဖစ္ျဖစ္၊ ဖုန္းကို တိုက္ရိုက္ ကြန္ပ်ဴတာနဲ႔ခ်ိတ္လို႔ပဲျဖစ္ျဖစ္ SD Card ထဲကိုထည့္ပါ.. SD Card ဟာ အနည္းဆံုး 2GB ရွိသင့္ပါတယ္.. တစ္ျခားဖိုင္ေတြမရွိေစရပါဘူး.. Android 4.03 RC 4.2 ထည့္ထားတဲ့ SD ကို ဖုန္းထဲထည့္လိုက္ပါ.. ကြန္ပ်ဴတာနဲ႔ခ်ိတ္ထားရင္ ျဖဳတ္လိုက္ၿပီး ပါ၀ါပိတ္လိုက္ပါ... ဖုန္းထဲမွာ ဘက္ထရီက အနည္းဆံုး ၇၅% ရွိေနရမွာျဖစ္ပါတယ္ေႏွာ္..
3. ဖုန္းကို Power ခလုပ္ နဲ႔ Volume up (အသံခ်ဲ႕ခလုပ္) ႏွစ္ခုကို ၿပိဳင္တူဖိထားလိုက္ပါ.. Recovery Mode ကိုေရာက္မွ လႊတ္ပါ..
4. ျမင္ရတဲ့ျမင္ကြင္းထဲမွာ Install zip from SD card ဆိုတာကိုေရာက္ေအာင္ေရြ႕ပါ.. ဖုန္းထဲက Volume+ ခလုတ္နဲ႔ Volume- ခလုပ္ကိုအသံုးျပဳၿပီး အေပၚေအာက္ေရႊ႕ရမွာျဖစ္ပါတယ္..
5. Install zip from SD card ဆိုတာကိုေရာက္ေအာင္ေရႊ႕ၿပီးရင္ Home Button ကိုတစ္ခ်က္ႏွိပ္လိုက္ပါ..
ထပ္ေပၚလာတဲ့ထဲက choose zip from SD card ဆိုတာကို ခုနကလိုပဲေရြးလိုက္ပါ..
6. သူ႔ဟာသူအလုပ္လုပ္သြားၿပီး ၿပီးဆံုးသြားရင္ back ျပန္သြားၿပီး Reboot system now ကိုေရြးၿပီးႏွိပ္လိုက္ပါ.. ဖုန္းက Restart က်သြားၿပီး ျပန္တက္လာပါလိမ့္မယ္..
ဖုန္းထဲက Setting>about phone>firmware ကိုျပန္စစ္ၾကည့္လိုက္ပါ.. Android 4.03 ေလးနဲ႔ လန္းေနတာျမင္ရပါလိမ့္မယ္...
အဆင္ေျပပါေစ..


အကိုေရ u8520 firmware ေလးရႏိုင္မလား
ReplyDeleteကၽြန္ေတာ္ firmware အဆင္မေျပဘူးျဖစ္ေန
တယ္ဗ်ာ ။ ။
တင္ေဇာ္ထြန္း
Huawei U8520 Firmware list
ReplyDeleteအမွားပါရင္ေတာင္းပန္ပါတယ္ ဒါေပမဲ ့လဲ ၾကိဳးစားျပီးတင္ေပးလိုက္ပါ တယ္ ။
http://www.mediafire.com/download.php?n9ia6j26k9epalb ဒါကpart 1 ပါ
http://www.mediafire.com/download.php?s37hsbqe22u9579 ဒါကpart 2 ပါ
http://www.mediafire.com/view/?mc5dq01idccjhjc ဒါကfirmwareေရးနည္း guideပါ
ကဲလိုခ်င္ေနတဲ ့သူငယ္ခ်င္းမ်ားနဲ ့ကိုိကိုမမတို ့အတြက္ပါ။
အကိုေ၇ TWZ E300 firmware ေလးတင္ေပးပါ့လား ေက်းဇူးတင္တယ္
ReplyDeleteအကိုေရ Samsung Galaxy S l9000ကိုလည္း
ReplyDeleteVersion ျမင့္တင္နည္ေလး တင္ေပးပါအံုး
Firmware တင္နည္းမ်ား ~ (It) ကိုထိုက္ >>>>> Download Now
ReplyDelete>>>>> Download Full
Firmware တင္နည္းမ်ား ~ (It) ကိုထိုက္ >>>>> Download LINK
>>>>> Download Now
Firmware တင္နည္းမ်ား ~ (It) ကိုထိုက္ >>>>> Download Full
>>>>> Download LINK